The Electric Educator: Forms
Showing posts with label Forms. Show all posts

Monday, December 16, 2019

Family Breakout: A new holiday tradition

Three years ago I accidentally created a family Christmas tradition. 😯
Let me explain...
My wife and I have five kids: ages 3, 5, 7, 9, and 11.
As you can imagine, Christmas is a pretty big deal.
Fortunately, my wife is super organized and LOVES Christmas.
Each year we buy 5 different rolls of wrapping paper - one for each kid. This helps us keep track of which present belongs to which kid.
Our wrapping paper trick also inspired a new family Christmas tradition...
Just before Christmas, I had purchased a BreakoutEDU box and needed a chance to test it out. 
(Watch this if you have no idea what a breakout box is)
I decided that Christmas morning was the perfect opportunity to give my breakout box a trial run! πŸ˜‚
Here is what my kids saw when they woke up on December 25...
Note on top of the breakout EDU box
My kids had to solve a bunch of puzzles and follow clues (I had age-appropriate options for everyone) to open each of the locks and "breakout Christmas."
Inside of the breakout box was a small piece of all 5 wrapping paper designs with a name written on the back: the key to figuring out which presents went to which kid.
We broke out!
The first year was a big hit and now the pressure is on for me to create better and more elaborate breakout!
Perhaps a breakout game is something you should add to your family holiday tradition!
A breakout game is a fun addition to your classroom holiday party or family gathering!
Here are some tips to help you get started.

🧰 Purchase, build or borrow a breakout box

  • Purchase a breakout box from BreakoutEDU for $150. It has everything you need.
  • Assemble your own breakout box for $70 (or less) using these instructions
  • Borrow a breakout box from school during Christmas break!
Advice: a physical breakout box with combination locks and keys provides a unique experience, however dealing with the physical set up can be a pain (does anyone remember the combination?).

πŸ’» Use Google Forms to create a digital breakout

If you would prefer a free option, you can use Google Forms to design a digital breakout by turning on the "response validation" option which turns free-response questions into a "lock".
The key to using Google Forms as a digital breakout is knowing how to enable "data validation." Watch this video (starting at 4:24) to learn more!
πŸ” Find or create a breakout game
Designing the game is the fun part! Here are the essential elements:
  1. Backstory - every adventure has a setting. Set up the story for your adventure (like my elf-on-the-shelf example).
  2. Puzzles and clues - your breakout experience will require 3-10 puzzles. Each puzzle will reveal a numerical or alphabetical code that is used to open one of the locks. Check out this list of puzzle 
    ideas.
  3. A reward or prize - What is the prize for solving the puzzle? Include an exciting surprise inside the breakout box (candy, movie tickets, and small presents work well).
πŸ’‘Creating a good breakout takes a lot of time and testing. It is wise to use or modify an existing game for your first breakout. My Christmas morning breakouts are modified from the BreakoutEDU library.

πŸ†“ Free games from BreakoutEDU
BreakoutEDU offers free and paid breakout games. The breakouts listed below are free, but you will need to create a BreakoutEDU account.

πŸ—️ Sample breakouts using Google Forms
Google forms make it easy to build a digital breakout for FREE!
πŸ’‘ BONUS: The three examples above are included in my list of 30 ways to use Google Forms in the classroom. You can download the full list here.
I would love to know if you include a breakout in your classroom or family gathering this year.
Tag me in your Tweet or Instagram post!

Friday, March 15, 2019

5 ways to prevent cheating on your Google Form Quiz

5 ways to prevent cheating on your Google Form Quiz


If you are using Google Forms to give quizzes and tests in your classroom, you are likely aware that some students have figured out various ways to "game" forms to get a better grade:

  1. Open a tab to look up answers
  2. Preview your form before class to look up answers
  3. Send questions to their friends
  4. Share answers with friends
  5. Take screenshots of your the quiz questions
  6. View the HTML page source to find answers
  7. Look at a friends screen to select answers
  8. Right-click on words to check definitions and spelling
  9. Share answers with classmates during passing time
  10. Write down "cheats" on their hand or paper

The fact that students are looking for shortcuts to improve their quiz scores shouldn't come as a surprise. (You may have been this student when you were in school!!)

I believe that formative and summative assessments have an appropriate role in the classroom and that it is our duty as educators to take reasonable action to maintain the integrity of these assessments.

Google Forms is a tremendous tool for organizing and automating digital quizzes. Here are five tips for designing "cheat proof" Google Forms!

πŸ‘‰ Note: want to see all of these tips in action? Check out this demo form!

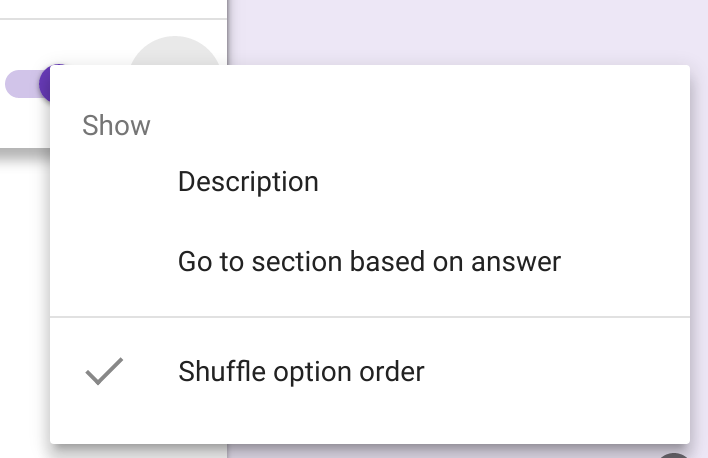
Shuffle answer choices to block screen creepers

When asking a multiple choice question, click on the "snowman" to find the "shuffle option order" feature which will randomize the order of the answer choices in your question.

Shuffling answer choices will make it more difficult for "screen creepers" to copy answers from a classmate.

Note: Google Forms does have a "shuffle question order" feature, however using it can lead to issues. I recommend shuffling answers over shuffling questions. 


Prevent cheating in Google Forms: shuffle option order

Use page sections to block assessment previews

Add sections to your quiz to prevent students from previewing a form before class. This is a common problem if you post your quiz through Google Classroom to all of your sections early in the day. 

You can take this a step further by adding a "password" to your form to prevent students from moving ahead until you are ready. 

An easy way to do this is to collect their personal information (name/section) on the first page of the form, but require a password before they can access the quiz question. 

Set up a password by adding a short answer question and using the data validation feature to require a specific number or phrase. 

Note: this is not a 100% secure solution and should not be used to protect sensitive information. 

Prevent cheating in Google Forms: add sections to prevent assessment previews

Use page breaks to create alternative assessment paths


Google Forms doesn't have a question bank feature to create different assessments for each student. However, you can create a similar experience by creating a branched form. 

First, add an un-graded multiple choice question in your quiz: “pick a number”, “pick a color”, etc. 

Next, set up 3-5 different sections to your quiz using the section feature mentioned in tip #2 above. Add as many questions as you like to each section.

Finally, add a "go-to" rule to direct students to a different section of the based on their response to the un-graded question that you added. 

Prevent cheating in Google Forms: use page breaks to create alternate assessment paths


Prevent cheating by asking better questions!


Don't limit your self to multiple choice questions. 
  • Sequence questions - use the "checkbox grid" question type to ask students to sequence or arrange items in a list.
  • Matching questions - use the multiple choice grid question type to create a matching question (great for vocabulary quizzes!)
  • Reading Passage - use the title/text element to add a short reading passage. 
  • Video question - have students watch a video and then answer questions about it (great for math and world language. 
  • Image question - images can be used as the question stem or question choices (great for science, math, social studies, and elementary students)
  • Free response / short answer - If a student can answer all of the multiple choice questions correctly, but can't articulate 2-3 sentences on the same topic...something is wrong.

Prevent cheating in Google Forms: ask better questions


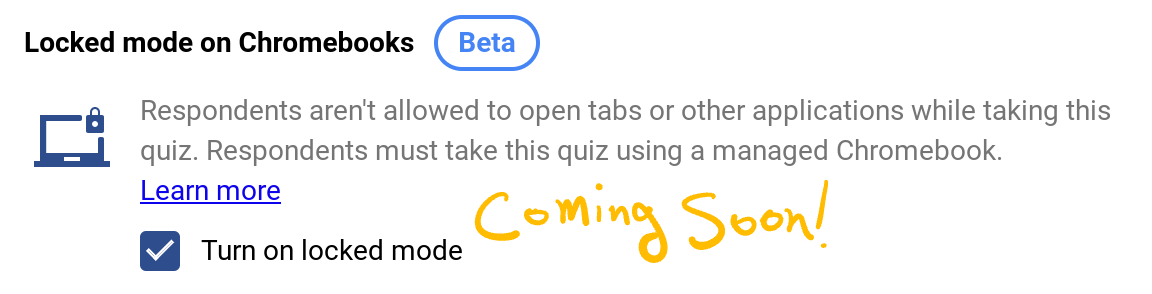
Enable locked quiz mode

Locked quiz mode is one of many tools you have to protect the integrity of your assessments. When used in combination with the tips above, you have done your part to protect the integrity of your classroom quizzes. 

Locked mode prevents students from accessing external resources while taking a quiz. Their tabs, extensions, chrome apps, and screenshot functions will be disabled during the duration of the quiz. 

You can turn on this feature the settings page on your Google Form OR when assigned through Google Classroom.

I wrote a detailed overview of locked quiz mode here.

Prevent cheating in Google Forms: locked quiz mode

If you use some / all of the tips listed above, you have done your part to protect the integrity of your assessments and encourage your students to practice academic honesty. 

There is no way to be 100% certain that students can't cheat on an assessment. Ultimately, they are harming themselves and their academic growth. Our job is to encourage, instruct and train them to do their best and show good character, even when they have the opportunity to cheat. 

Monday, March 4, 2019

5 tips to design better forms


5 tips to design better forms...

Google Forms is a marvelous tool in the classroom. Get even more value out of form by applying these five tips that go beyond the basics.


1. Use validation to collect better data

Your Google Form is only as good as the data it collects. If your data is a mess, it won’t be very useful.

Many of the question types in Google Forms offer a setting called “response validation.” Use it to require a response to fit a certain criteria:


  • Checkbox questions: set a minimum or maximum number of choices that can be selected.
  • Short Answer question: use the Regular Expression feature to get consistently formatted phone numbers, zip codes, or state abbreviations.
  • Paragraph Question: set a minimum or maximum response length

2. Make your form look pretty!

While Forms has added the ability to change the header image, background, and some limited font options, with a little effort you can really make your form look nice!

I frequently split my form into different sections and use the image element to add graphics.

A good example is this conference registration form: http://tinyurl.com/y48js49p


I use Canva to create most of my form graphics. I discovered that the “Leaderboard” template works really well with forms.

Another trick you can try is adding emoji to your form questions and answer choices. I use the πŸ”₯and πŸ‘‰ symbols to emphasize important information or 1️⃣2️⃣3️⃣4️⃣ if I have a set of steps I want to clearly explain.

The Emoji One Chrome extension is what I use to access emoji icons on my Chromebook (works on Mac and PC too!).


3. Automate with Add-ons

Once you’ve mastered the essential elements of forms, you MUST dive into add-ons.

Add-ons are like apps for Google Drive. To become a true Form Fanatic you need to be familiar with add-ons for forms AND sheets.

Add-ons will help you work more efficiently and create automated systems. I use a LOT of different add-ons for different situations. Here are some of my favorites:

Form Add-Ons:

  • Choice eliminator removes MC options from your form after they have been selected. Great for sign-ups, volunteer opportunities, and reservations.
  • Form Limiter will set limits on how long your form is available or how many responses a form will receive before it is turned off. Great for forms with deadlines.
  • Use Email Notification for Forms to send out email or mobile phone notifications when a new submission is received.

Sheet Add-ons

  • Autocrat is one of my personal favorites! I use Autocrat to generate documents based on form data (certificates, invoices, meeting agendas, etc)
  • Copy Down isn’t super exciting, but it’s very helpful! I use Copy Down to apply formulas to incoming form data to create automatic calculations.
  • FormMule is an email merge utility that you can use to send customized emails based on form responses. I use FormMule when I need to run calculations on my form data before sending out an email.
There are a LOT more add-ons, but those are some of my favorites!


4. Filter, Sort, and Pivot your Data!

We use Google Forms to collect data. Once someone submits a form, the information gets dumped into Google Sheets...and things get interesting!

A spreadsheet is an amazing tool for collecting and organizing information. Here are three things that you should know how to do in Google Sheets:


  • Sort - Sort a column in your spreadsheet to organize your data alphabetically or numerically. This is basic, but very useful!
  • Filter - Filter your sheet to isolate the information you want to see. For example, you might use the filter option to hide quiz scores for your first and third hour classes so that you can review the scores from second hour.
  • Pivot - A pivot table lets you look at your data from a different perspective. This is especially helpful with things like test scores or survey information. For example, you might “pivot” your data to see if the 8th grade students who had failing grades in math also struggled in their ELA courses.
Data analysis is super important topic. If you want to learn more, I recommend that you connect with Ben Collins, the smartest Google Sheets guy I know!


5. Autograde and lock your quizzes!

Google Forms has a special quiz mode that will auto-grade student choices!

Stop wasting your precious time hand-grading paper quizzes! Auto grade them!

Don't limit your quiz to traditional multiple choice questions! Here are a few ideas you might want to try:
  • πŸ–Ό Image Questions - insert and image of a map or equation and and then ask comprehension questions (great for math and science!)
  • 🎦 Video Questions - Add a short video to your quiz and then ask questions about the video content (great for world language!)
  • ✅ Check Box Questions - Use the checkbox question and have students select “all that apply.”
  • πŸ“ Matching Question - use the grid question type to set up a matching question.
Be creative... there are LOTS of possibilities.

You may have heard about the new LOCKED MODE for Google Forms.

I shared an early review a few months ago. When enabled, locked mode will prevent students from accessing other information during a quiz.

It's pretty awesome!


Locked mode is NOT available yet...but it should be very soon (March?)! Watch this video or read this blog post to see how it works!

Are you ready to become a Form Fanatic?

Each spring I teach a 5 week Google Forms masterclass. Join me for a deep dive into Google Forms!

I offered this course for the first time in the spring of 2018 and the feedback was outstanding:

"I was a casual user of Forms, but I was not using the data that I had collected to it's full potential. Now I am writing better Forms so my data is of higher quality and I am better able to analyze the results so I'm making decisions based on data...not just giving surveys." - Laura Foreback, middle school teacher
This course is perfect for classroom teachers, tech coaches, and school administrators!

Interested? Click here for details!

Tuesday, April 10, 2018

How to Create a Matching Question in Google Forms


You have probably used Google Forms to ask free response or multiple choice questions, but did you know that you can also create a matching question? 

Forms doesn't offer an obvious "matching" question type, but with a little creativity, you can make it work! 

The secret is to use the "grid" question type to set up a matching style question. 

Unfortunately the quiz feature available in Google Forms will not work with "grid" questions however you can use the Flubaroo add-on for Google Sheets to auto-grade quizzes with this type of question.

Tips:

  • Place your definitions in the row and use the columns for your terms. 
  • Enable "require a response for each row."
  • Make sure that you select the "limit to one response per column option" 
  • Enable "shuffle row order"
Watch this short video for some additional tips on creating a matching question with Google Forms.


This video is part of my online course "Google Forms for Educators." In this 5 week course I help educators use Google Forms to organize their classroom and create automated systems so that they can spend less time shuffling paper and more time connecting with students. Interested? Visit chrm.tech/forms for details!

Here's a live example of a matching question using Google Forms. 


The width of the embedded form is a bit too narrow to properly show all of the text. I recommend that you view the form here to get the full experience.

------------------------------------------------------

Are you ready to become a Form Fanatic?

Are you a Form Fanatic?Each spring I offer a 5 week Google Forms masterclass. Join me for a deep dive into Google Forms!

The feedback has been outstanding:
"I was a casual user of Forms, but I was not using the data that I had collected to it's full potential. Now I am writing better Forms so my data is of higher quality and I am better able to analyze the results so I'm making decisions based on data...not just giving surveys." - Laura Foreback, middle school teacher
This course is perfect for classroom teachers, tech coaches, and school administrators!

Interested? Visit Chrm.tech/forms for all the details!


Sunday, April 8, 2018

Google Forms: Set your Default Preferences

Google Forms: Set default preferences

I uncovered a helpful feature in Google Forms that I thought was worth sharing. You can change your default preferences! This is very handy for teachers who create a lot of quizzes using Forms.

The preference options include:
  • Make questions required by default
  • Set default point value for quiz questions
  • Turn on email collection by default


Are you ready to become a Form Fanatic?

Are you a Form Fanatic?Each spring I offer a 5 week Google Forms masterclass. Join me for a deep dive into Google Forms!

The feedback has been outstanding:
"I was a casual user of Forms, but I was not using the data that I had collected to it's full potential. Now I am writing better Forms so my data is of higher quality and I am better able to analyze the results so I'm making decisions based on data...not just giving surveys." - Laura Foreback, middle school teacher
This course is perfect for classroom teachers, tech coaches, and school administrators!

Interested? Visit Chrm.tech/forms for all the details!

Friday, March 16, 2018

30 Ways to use Google Forms in the Classroom (updated examples!)


Google Forms is one of my favorite classroom tools.

But here's the deal - most teachers aren't taking full advantage of what Google Forms has to offer!

You have probably used Forms to create a survey or give a quiz, but that's not all Forms can do!

Here are 30 different ways you can use Google Forms in your Classroom - with an example for each!


I also created a PDF version of this post with links, images, and an option to make a copy of each form. Click here and I'll send it to you via email!

1. Reading Quiz - Hold students responsible for reading assignments by giving a simple quiz. This example is based on Fahrenheit 451 in a high school English classroom and is configured to release the quiz score immediately after submitting the quiz.

2. Chromebook Quiz (with images) - This quiz uses images to test basic Chromebook literacy. It is set up so that the student immediately receives their score and can see which questions they got wrong.

3. Bell ringer / Do now activity - This morning math check in activity is completed by students first thing in the morning before the start of class. The form uses data validation to provide hints if the student is struggling to get the correct answer.

4. Mood Check-in - Students will have a difficult time learning if the arrive at school filled with worry and concern. This mood check in provides a safe space for students to share their current mood and concerns with you. By using a tool like Form Postman you can configure the form to send you an email if a student indicates a negative emotion.

5. Permission slips - Field trips are fun. Permissions slips are not. This form allows parents to digitally sign permission slips. In an effort to prevent students from completing their own permission slip a parent email address is required and a notification is sent to this email address using Form Postman.

Choice eliminator is used to remove student names from the drop-down list once a parent has given their permission. This makes it easy for a teacher to identify which students do not have a permission slip on file.

6. Book report generator - Writing reflectively is a key component of the common core standards. A book report is a tremendous way to help students practice reflective, informational writing, and to also encourage them to identify elements of literature such as genre, plot, and setting. As a bonus, they can share their writing with others!

This form provides a simple way for students to share their thoughts on a book that they have read. I am using a tool called AutoCrat to take the form submissions and turn it into a nicely formatted Google Doc which can be easily printed or shared electronically.

7. Lab Data Collection - Simplify data collection and analysis for your next lab activity! In this example, student submit their lab data through a Google Form which automatically updates the totals on the lab document.

Tim Welch set up a similar activity with a detailed video and written explanation.

8. Yearbook Photo Page - Google Forms has a file upload feature that you can use to collect digital files. In this example, teachers submit their favorite Bitmoji image for use in the school yearbook.

You can go even further by using AutoCrat to take the images and add them to Google Slide presentation ready for printing!

Jennifer Scott is using Google Slides to design her school yearbook. Check out how she uses this system in this video.

9. Certificate Creator - Creating certificates is a pretty common tasks in education. Whether honoring students for their academic or athletic achievement or documenting professional development activity. Forms is a convenient way to generate certificates.

This simple example collects your name and email address to generate a simple certificate in Google Docs which is emailed to you as a PDF.

10. Form to Lesson Plan - Use a Google Form to fill in your plans each week. This form is filled with checkbox and drop down fields to simplify submitting information.

Thanks to Amanda Dykes for sharing this example! Check out this guide to setting up and using this form!

11. Course Evaluation (with branching) - Good teachers seek feedback and constantly work to improve their course. This is the course evaluation form that I use to solicit feedback on my online courses. This form takes advantage of question branching; based on your answer to a question the form splits to ask additional follow up questions (i.e. indicating that you would like a sticker takes you to the address section).

12. Call for Speakers Form - If you help organize a conference or professional development day you can use Google Forms to collect session descriptions. This example is carefully designed to collect all of the information that is used to create the conference program with minimal editing.

13. Elementary reading Inventory - Use this form when evaluating the reading fluency of a student. Reading inventories are typically completed 2-3 times each year. This form makes it easy to collect store, and analyze collected data to observe student growth.

14. Idea / Opportunity Tracker - Record ideas when inspiration strikes! Add in your own categories and fields to make sorting and organizing your ideas easier. Use the reminder add-on for sheets to receive an email reminder of upcoming opportunities. I have this form saved as a bookmark for easy access.

15. Google Forms as a Rubric - Rubrics are the ideal method of evaluating project based learning. This Google Form makes it easy to complete an evaluation while you are reading a student paper or viewing their physical project. Use a tool like AutoCrat or FormMule to automatically send students a summary of your evaluation and comments.

Google Forms for Educators


16. Track Standards Based Grading - This simple Google Form simplifies the process of tracking standards-based grades using Google Sheets. This form is filled out by the teacher each time you introduce a new assignment to your students. Once submitted, you can view and modify student grades through Sheets.

Watch this video for more insights on how to setup and use this system in your classroom!
Thanks to Stephanie Howell for sharing this example!

17. Parent Teacher Conference Sign Up - Coordinating conferences with parents is a difficult administrative task. This Google Form collects the necessary information and displays the available time slots. By using the Choice Eliminator add-on time slots are automatically removed from the form once selected, minimizing the chance of double booking. The FormMule add-on automatically sends an email with conference information.

18. Discipline referrals - Quick action is important when dealing with student discipline issues. Google Forms provides an easy way for teachers to submit incident reports which can immediately be routed to the appropriate administrator for follow up. Because Form data is pushed to Google Sheets, administrators can add additional comments and use a tool like AutoCrat to generate a discipline referral documents.

19. Volunteer Registration - Coordinating volunteers is a lot of work! Google Forms can help organize and coordinate volunteer positions. By using a tool called “choice eliminator” you can automatically remove volunteer opportunities after they have been filled.

20. Parent Contact form - The parent contact information that schools have on file is frequently incomplete or out of date. During back to school night I provide parents and opportunity to share their contact information with me so that I can keep them up to date on the progress of their student. This is also a great time to ask if the parent is interested in receiving Google Classroom updates.

21. Engagement tracker - Are your students engaged in classroom learning on a daily basis? Anecdotal observations frequently fall short when you are tracking engagement of 25 or more students. This simple form makes it easy to quickly scan your classroom and identify students who are engaged in the learning process. Over time, the summary of responses will reveal which students are regularly engaged, allowing you to identify opportunities to improve instruction and intervene with students who are frequently disengaged.

22. Behavior logs - This form was created for a school that adopted the Antecedent - Behavior - Consequence (ABC) discipline model. The form allows a teacher to make quick observations using their mobile phone which they can review, modify, and update during their planning period.

23. Parent contact log - This is a simple form to record conversations with parents and guardians. Veteran teachers understand the importance of documenting classroom communication to resolve conflicts and comply with IEP requirements.

24. Student progress tracker - When working on a long-term assignment such as a research paper, tracking student progress and understanding what each student is working can be challenging. Ask your students to complete this form each time they finish a component of their project. This will give you a snapshot of what students are working on.

This form has been configured to automatically collect user email address and limit to one response. After submitting the form the first time, the student will be prompted to “edit your response” rather than submitting the form a second time. This allow them to update their progress so that the form response data is accurate.

25. LIVE Reading log - Keep track of how many books and pages your class (or school) has read by taking advantage of the LIVE chart and graph feature of Google Sheets.
  • Have students log their reading using a Google form (like this)
  • The data that is collected feeds into a Google Sheet (like this)
  • Create a chart that tracks pages and books read. (like this)
Embed the chart into a Document, Presentation, or Google Site and watch it grow!

26. Classroom Observations - School administrators can create a standardized and transparent observation system with Google Forms. This Form includes all of the agreed upon observation criteria which can be completed on a mobile phone or tablet during the walk through. This system removes the guesswork from observations. By using a tool like FormMule the administrator can provide a copy of the observation to the teacher immediately upon submitting the form.

27. Kindergarten Registration - Google Forms is a helpful tool for collecting information on incoming Kindergartners. This form is filled out by teachers after interviewing new students. After submitting the form, a summary document is generated by AutoCrat which is accessible to the entire grade level team and school administrators.

28. Digital Escape Room - Google Forms can be used to create a digital puzzle, similar to an escape room or BreakoutEDU box. This example example was created for a teacher conference. Forms like this are accompanied documents, links, videos, etc which contain the answers to the riddles. Escape forms like this take advantage of page breaks and data validation to block progress until the correct answer is submitted.

29. Elementary Math Quiz - This simple math quiz helps first grade students practice basic math skills and the use of technology in the classroom.  This example places each question in its own section so that students can only see one question at a time. Images are used extensively to reduce the reading complexity.

30. Digital CLUE - Technology Coach Stephanie Howell from Pickerington, Ohio created a version of  CLUE using Google Forms! Students answer content questions to reveal clues that can be used to identify a suspect, location, and method to solve a classroom mystery.

Watch this detailed video to make your own version of CLUE using Google Forms!

I hope I have been able to inspire you with what you can accomplish with forms! I would love to help you dig into creating Forms for your classroom.


Want to design better forms?

Each spring I teach a 5 week course via Google Classroom for teachers like you! You can get the details and find out the next time I'm offering the course by visiting chrm.tech/forms.


Friday, September 23, 2016

10 Google Forms Tricks!


Google Forms is great! You can use it to create a survey or a quiz, or collect registrations. But there is more to it than you might think. Here are 10 tricks to help you get more out of forms!


1. Limit response length
When using short answer or paragraph text question types, turn on data validation to limit response to within a certain character limit. Note that this is a character, not a word limit. Turning this feature on does not provide users with a character count, but they will see an error message if they exceed the limit.


This feature can be used to limit responses on forms such as a call for speakers or to ensure that complete sentences are used on a student quiz.


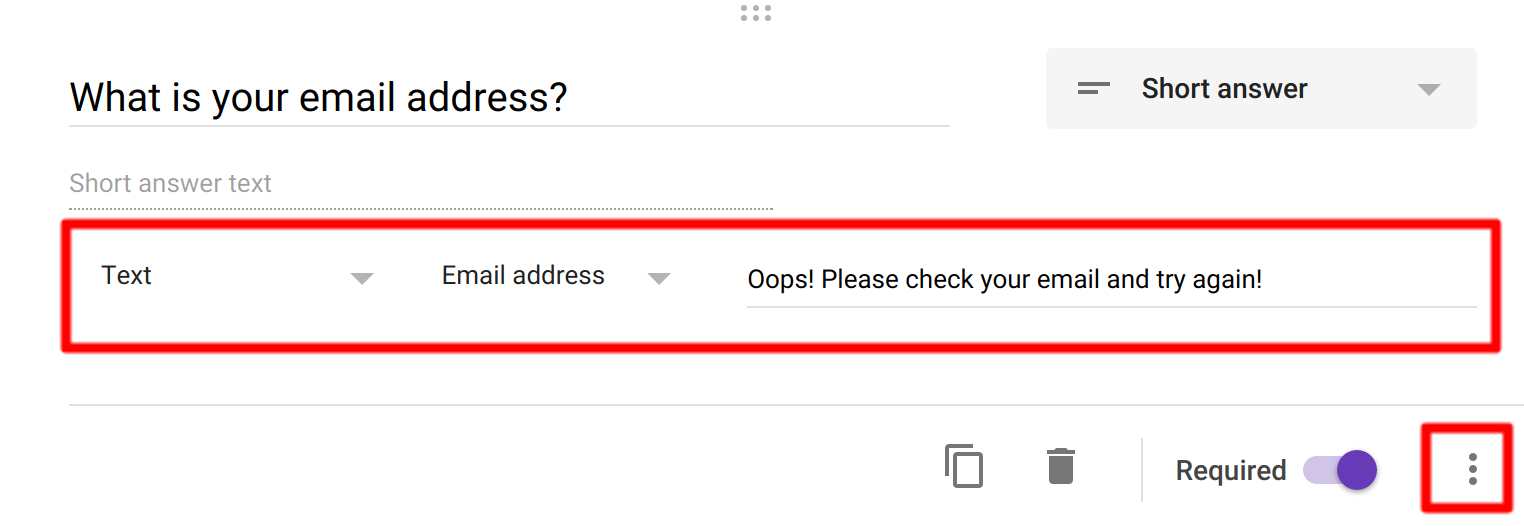
2. Validate Email Addresses
For some reason, people have a hard time typing in their own email address. It is not uncommon to get email addresses with accidental spaces, commas, or incomplete information (i.e. no .com). You can eliminate this issue by using the data validation tool for email address on a short-answer question. This ensures that the information provided will fit username@domainname.com/net/org.


3. Shuffle option order
Preventing cheating is a concern of teachers who use tools such as Google forms to deliver assessments. While it is impossible to eliminate all possible methods of academic dishonesty, you can certainly make it harder to cheat! Turn on “shuffle option order” for a multiple choice or checkbox question to randomize your assessments. This feature can be used inplace of the “shuffle question order” option or in conjunction with it. Using this feature will NOT impact the use of Flubaroo or the quiz feature of Google Forms.


4. Block your sections
If your form has several distinct sections such as personal information, and survey questions, or sections from different topics covered in class, you can block them in two ways:


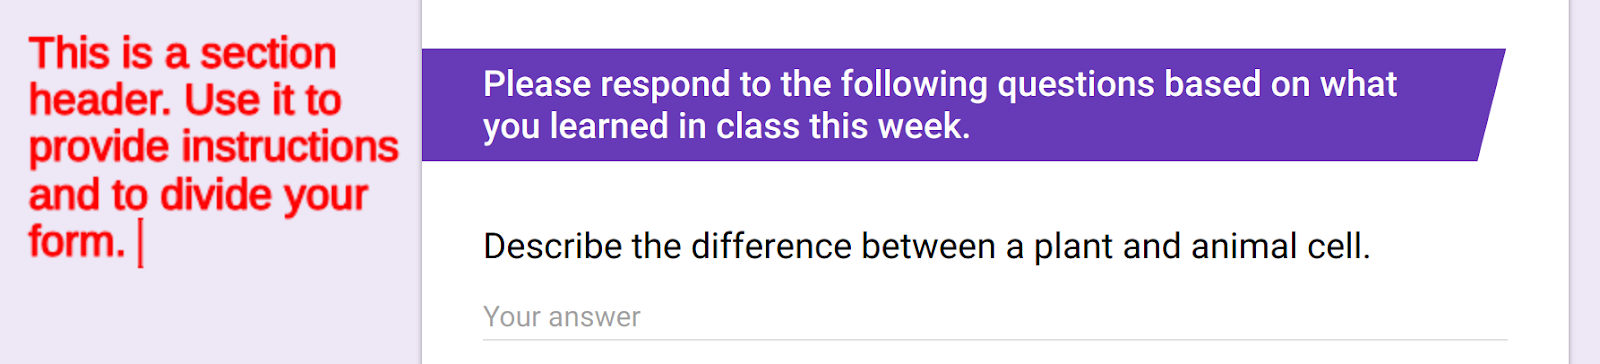
Insert Title / Description
Use this feature of forms to add a colored break in the form to identify a new section. You can also add a description with special instructions. Using this element does not break your form into multiple parts.


Insert Section
A section is similar to the Title / Description except that it actually inserts a page break into your form. This is helpful if you want to clearly divide your form into multiple parts. For quizzes, this can be a helpful way to prevent students from looking ahead/behind in the quiz. You can also show users a % meter to indicate how much of your form is complete.

Screenshot 2016-09-21 at 10.32.44 PM.png


5. Create branching forms
Remember the old “Chose your own adventure” books? You would get to the end of the page and either go to page 7 or 15 based on a decision you made for the characters in the story? Google Forms can do the same thing.


Configure a multiple choice question to take the user to a new set of questions based on their response. This is very helpful if you want to skip a section that is not relevant to the person completing the form. It can also be used as a simple adaptive assessment tool. If a student answers a multiple choice question incorrectly, they can be directed to an easier question or to material that will help them review the skill they need to develop.


In order to use the branching feature of forms you must have to elements:
  1. A multiple choice question
  2. A least two sections (see above) in your form.


6. Use Multimedia
Text-only forms are boring. Make them more engaging by including video and images! This is especially helpful when using forms for assessment purposes. Here are three ideas to consider:


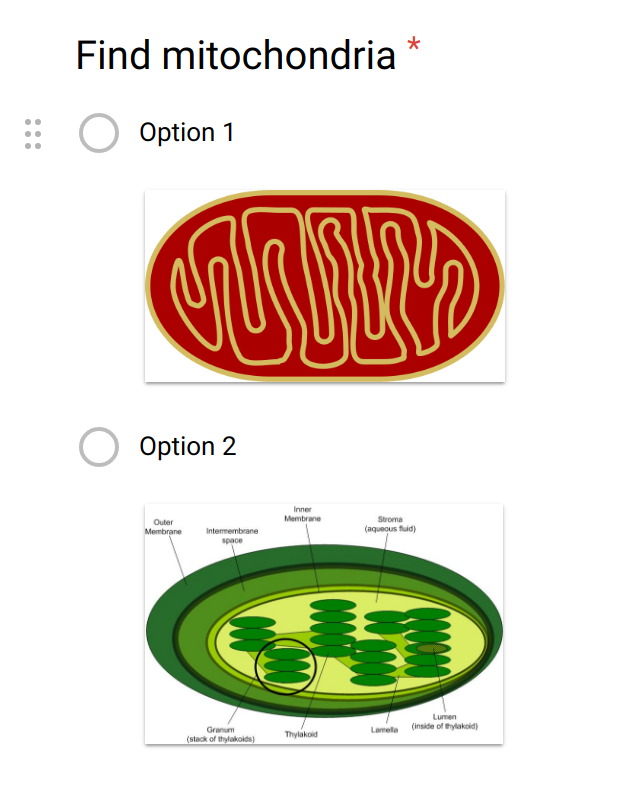
  1. The labeled image - insert an image with a series of labeled elements (i.e. parts of the cell, characters in a story, etc). Below the image, insert several questions that require students to reference the image above.
  2. The Video challenge - Insert a YouTube video into your form that provides students with a quick (1 min or less) set of information. Ask questions about the image. This works great for music and world language courses!
  3. The Animated Gif - use an advanced image search to find animated .gif files. Save and insert the image into Google forms and watch it move! This trick is great for science courses and for schools who are blocking YouTube.


NEW: As of August, 2016 you can now use images for multiple choice questions! This is a great new feature that will be particularly helpful to elementary and math teachers. If you are using Flubaroo or the Quiz feature in forms to grade assessments, it is important to make sure that you do include a text label in your form otherwise you will not be able to determine which selection a student made when you look at the linked spreadsheet.


7. Reuse your form - not your spreadsheets
It takes a lot of work to develop a survey or quiz using Google Forms. Once you have invested the time to create a form you can re-use it over and over again! DON'T make a copy of your form, instead, follow these steps.
Note: these directions are for the NEW forms. If you have old forms, you may need to update them before following the steps below.


  1. Open your form
  2. Click on the response tab
  3. Click the “snowman” (three dots in the right corner) and select “unlink form.” This will unlink the form from the previous sheet that was collecting responses. It will NOT delete the data you have already collected.
  4. Click the “snowman” again and select “delete responses.” Although you have disconnected the spreadsheet, your form still retains the previous response data. This action will reset your form to zero. The original form data IS still contained in the spreadsheet that was unlinked in step 3.
  5. Click the snowman and click “select response destination”. Name the spreadsheet with a specific name. This is where NEW responses will be sent.


This trick above is helpful for teachers who have multiple sections of the same course but don’t want to copy their form for each section. Each section gets its own SHEET, not its own FORM.


8. Copy / paste a list
Sometimes it is best to ask respondents to make a selection from a list rather than type in a response. Typing that list into Forms can be tedious. Instead, copy and paste it! Google Forms will place the copied elements into the form as a new selection. This is great for creating a class list or a selection of times for parent teacher conferences.  


Note: there does seem to be a limit to how many lines can be copied at one time. If you are having trouble pasting your list, try a smaller number of items (10-15 seems to work).


9. Form Restrictions & Roadblocks
There are times when you may wish to prevent a form from being completed until certain other actions have been taken. For example, a teacher may not want students to take a quiz until she has verified that they have completed their homework. Google forms only offers an on/off feature and does not offer password protection.


You can setup a makeshift password protection on your form by using the data validation option in a short-answer response. Here’s how:


  1. Create a new section in your form. This is where your “password” field will live.
  2. Create a short answer question in section 1.
  3. Turn on data validation and set it to: Number > Equal to > [insert a secret number]
  4. Add help text: Please check in your homework to receive the password to complete this quiz.
  5. Add your quiz questions starting in section 2.


Note: this is NOT a 100% secure system and should not be used to protect critical information. It is possible to reverse engineer the secret code. Some of your students may know how. I will not explain how here in case they are reading this right now...! = )


10. Add-Ons
Need to do something else not listed here? Add-ons may hold the solution to your problem! Add-ons are utilities that can expand what Google Forms does on it’s on. Add-ons must be “installed” before you can use them. To access the add-ons, click the “snowman” icon in the top right corner of a form and look for the “add-on” puzzle piece icon.


While there are many add-ons available, these are the ones that I have found quite helpful.
  • Choice Eliminator 2 - removes options from your form once they have been selected. Perfect for time slot registrations or other limited quantity applications.
  • FormRecycler - pull in questions from other forms.
  • FormLimiter - restrict your form to only accept a specific number of responses or turn it off at a certain time.
  • Form Publisher - publishes form responses as documents or PDFs. Very helpful when collecting long-form responses which are difficult to read in a spreadsheet.
  • All Questions Required - yup, that’s what it does!

Did I miss anything? Let me know what form feature is your favorite!

Interested in seeing these ideas in action? Check out my post on 25 Ways to use Google Forms in the Classroom!

--------------------------------------

Are you ready to become a Form Fanatic?

Are you a Form Fanatic?Each spring I offer a 5 week Google Forms masterclass. Join me for a deep dive into Google Forms!

The feedback has been outstanding:
"I was a casual user of Forms, but I was not using the data that I had collected to it's full potential. Now I am writing better Forms so my data is of higher quality and I am better able to analyze the results so I'm making decisions based on data...not just giving surveys." - Laura Foreback, middle school teacher
This course is perfect for classroom teachers, tech coaches, and school administrators!

Interested? Visit Chrm.tech/forms for all the details!