The Electric Educator: Tech Tips
Showing posts with label Tech Tips. Show all posts

Tuesday, April 10, 2018

How to Create a Matching Question in Google Forms


You have probably used Google Forms to ask free response or multiple choice questions, but did you know that you can also create a matching question? 

Forms doesn't offer an obvious "matching" question type, but with a little creativity, you can make it work! 

The secret is to use the "grid" question type to set up a matching style question. 

Unfortunately the quiz feature available in Google Forms will not work with "grid" questions however you can use the Flubaroo add-on for Google Sheets to auto-grade quizzes with this type of question.

Tips:

  • Place your definitions in the row and use the columns for your terms. 
  • Enable "require a response for each row."
  • Make sure that you select the "limit to one response per column option" 
  • Enable "shuffle row order"
Watch this short video for some additional tips on creating a matching question with Google Forms.


This video is part of my online course "Google Forms for Educators." In this 5 week course I help educators use Google Forms to organize their classroom and create automated systems so that they can spend less time shuffling paper and more time connecting with students. Interested? Visit chrm.tech/forms for details!

Here's a live example of a matching question using Google Forms. 


The width of the embedded form is a bit too narrow to properly show all of the text. I recommend that you view the form here to get the full experience.

------------------------------------------------------

Are you ready to become a Form Fanatic?

Are you a Form Fanatic?Each spring I offer a 5 week Google Forms masterclass. Join me for a deep dive into Google Forms!

The feedback has been outstanding:
"I was a casual user of Forms, but I was not using the data that I had collected to it's full potential. Now I am writing better Forms so my data is of higher quality and I am better able to analyze the results so I'm making decisions based on data...not just giving surveys." - Laura Foreback, middle school teacher
This course is perfect for classroom teachers, tech coaches, and school administrators!

Interested? Visit Chrm.tech/forms for all the details!


Sunday, April 8, 2018

Google Forms: Set your Default Preferences

Google Forms: Set default preferences

I uncovered a helpful feature in Google Forms that I thought was worth sharing. You can change your default preferences! This is very handy for teachers who create a lot of quizzes using Forms.

The preference options include:
  • Make questions required by default
  • Set default point value for quiz questions
  • Turn on email collection by default


Are you ready to become a Form Fanatic?

Are you a Form Fanatic?Each spring I offer a 5 week Google Forms masterclass. Join me for a deep dive into Google Forms!

The feedback has been outstanding:
"I was a casual user of Forms, but I was not using the data that I had collected to it's full potential. Now I am writing better Forms so my data is of higher quality and I am better able to analyze the results so I'm making decisions based on data...not just giving surveys." - Laura Foreback, middle school teacher
This course is perfect for classroom teachers, tech coaches, and school administrators!

Interested? Visit Chrm.tech/forms for all the details!

Tuesday, February 6, 2018

Spot Check Assignments with Google Classroom (Video Overview)

Spot Check Assignments with Google Classroom

Research projects strike fear into the heart of most students. These big projects also strike fear into the hearts of teachers because they require a lot of planning and take FOREVER to grade!

Grading complex, long term assignments is overwhelming because there is so much to do all at once. Google Classroom can help.

Use the question tool in Google Classroom to provide a place for students to submit a portion of their research assignment. You might grade their introduction, thesis statement, bibliography or body paragraph, for example.


Instruct your students to copy and paste that portion of their assignment from Google Docs (or whatever they are using) into the question you created in Google Classroom.

The result is a nice, neat list of student work right in Google Classroom. You don't need to open up 25 different Google Documents (big time saver)! You can now provide feedback directly from Google Classroom which students can apply to their paper during the next class period.

Spot check student work using Google Classroom


If you do this for each component of your assignment, by the time your students turn in their final project, you have provided feedback on each individual component. The final grading process should be relatively quick.

Sunday, January 7, 2018

5 Ways to improve your use of Google Classroom

5 Ways to improve Google Classroom

Google Classroom is an outstanding tool for managing your classroom. Without it, simple tasks like sharing documents, tracking late assignments, and organizing class discussions would be very difficult.

Here’s the deal, most teachers are only scratching the surface of what they can do with Google Classroom! Posting assignments and receiving student work is just the beginning.

Today I would like to share 5 advanced ideas for getting more out of Google Classroom!

1. Use your “About” page.

The “about” page in Classroom is prime real-estate. Unlike the stream, the about page is “static” which means you can organize resources by importance. Only you, the teacher, can post to the about page so it doesn’t get cluttered by class comments or student posts.

How can you actually use your about page?

I recommend including anything that students are regularly asking you about or resources they need to reference on a regular basis. This may include login instructions to access your online textbook, a link to your school’s online grade book, extra credit opportunities, equations, formulas and other “cheat sheet” type information or enrichment activities.

That’s not all...

Rather than posting each of these resources individually, create a Google Doc on which you list all of these resources. There are two benefits to packaging resources this way:
  1. Your about page won’t become cluttered
  2. If you manage multiple sections of the same class, you can update all of your classes by updating the Google Doc rather than updating each class.
Here are two “about page” templates ready for use:
Make copies, add your own resources and post them to your about page!

2. Organize your stream with topics

The topics feature in Google Classroom will organize posts in your stream.
Why does it matter?
Google Classroom - Stream Topics
Teachers and students have both complained that the stream in Google Classroom gets crowded and overwhelming. Google hasn’t included a search feature for Google Classroom (awkward!). At this time, your best strategy is to create topics.
Topics are especially important if you have a year-long or very active class as the stream quickly becomes flooded with assignments.

The easiest way to organize your classroom posts is by unit. Topics are listed alphabetically, so you may want to list them as “unit 01” if you have more than 9 units.

Keep your topics to a minimum. If you have too many, they become difficult to manage and navigate.


3. Embrace Emoji πŸ€”

Using emoji characters in email and other text communication is not just some frivolous “millennial” activity; emoji can actually be quite useful for classroom teachers.

A recent experience pointed this out to me.

I took an online course from Tony Vincent. Tony consistently used emoji in his assignments to call out important details and tips. I had never seen someone use emoji to effectively. It was great!

Consider using emoji in your directions, assignments or instructions to help break up long sections of text and emphasize important actions such as “πŸ‘️ watch this video...”, “⚠️ watch out for...” “🀞don’t forget to...”
Adding emoji to Google Classroom
Here’s what you need in order to get started:
Install this emoji extension for Google Chrome.
The next time you want to insert an emoji, just click the extension, select your emoji and copy / paste it into the text field
Bonus: Tony just announce a new course “Classy Videos” that will start in January. I enjoyed his Google Drawing Class and would recommend anything he offers! More info here.

4. Schedule Announcements


Google Classroom has three types of posts - assignments, questions, and announcements. One of these is not like the others!
Announcements have some unique characteristics:
  • Announcements don’t have due-dates so they don’t show up on the class calendar.
  • Announcements aren’t sent to guardians
  • There is no way to track if students have read announcements.
Here’s the thing - because I can’t track which students have read my announcements and they aren’t sent to guardians, I only use the announcement feature for non-critical information. Here are two ways that I use it:

First, I try to connect with my students on a personal level with fun messages.
Marc Seigel has a whiteboard in his classroom on which he writes #wordsofawesome. These messages could easily be added to Google Classroom as well.
Google Classroom takes the hassle out of daily classroom routines and procedures which leaves us more opportunities to connect with our students on a personal level. Scheduling encouraging announcements is one way you can do this.
Marc Seigel (@daretochem) shares #wordsofawesome to his class every morning.
Ashlie O’Connor (@oconnorashlie) schedules fun holiday messages with BitMoji.
The second way I use announcements is for assignment reminders.
Are your students working on a big project like a research paper or class presentation? Students can get overwhelmed by big projects with far-off due dates. Use the announcement feature to schedule checkpoints along the way.
Here’s how to get started:
  • First, I create an assignment with the final due-date of the project. This is an important step so that the assignment shows up on the class calendar.
  • Next, create several (weekly?) announcements with statements like “There are now 3 weeks until your final project is due. By this time you should have identified your primary sources and begun working on our outline. If you need help, please come and see me during lunch or after school...”
Scheduling announcements is the secret!
The key two both of these uses of the announcement feature is to create the posts when you have time, and schedule them for a future date. Schedule as many encouraging announcements as you can in 15 minutes.


When you are planning your next big projects, schedule your reminders at the same time using the announcement feature. Do it now so you don’t have to think about it later!

If you have never scheduled a post in Google classroom, watch this video!

5. Record directions with Screencastify

My final tip may be the most helpful because it solves a complaint that I have had for many years.

Have you ever written out step-by-step instructions for a technology-related tasks? It’s super difficult and highly annoying! That thing that takes you seconds to do is an 8-step process that fills up 1/2 of a Google Doc!

Instead of writing out these instructions, record them using Screencastify!

Screencastify is a free screen recording extension for Google Chrome. You can use it to record what you are doing on your screen while you talk students through your instructions.

Not convinced?
The next time you are schedule to be out of the classroom, use Screencastify to create your sub plans! Talk about a time saver!

When you record and post directions using Screencastify students can watch it on-demand. They can pause, rewind, and follow along as many times as needed!

I use Screencastify so much that I upgraded to their premium version. At only $24/year it’s a great deal! You don’t NEED the premium version of Screencastify, but if you use it regularly, it’s worth the $24 to upgrade. If you are interested in upgrading, use this link and Screencastify will buy me a cup of coffee!

Why do these ideas matter?

By using these 5 ideas you can spend more time connecting with your students. Technology will never replace teachers, but it can free us up to do what we do best - helping students see their potential.

Have some tips of your own? Please leave me a comment and share your ideas!

Wednesday, August 16, 2017

Should you teach technology in your classroom?

Do you have time to teach technology skills to your students? Unless you teach technology, probably not!

In a perfect world, students would learn how to use technology in tech class and would APPLY that knowledge in your class as you explore math, science, history, etc.

Sadly, fewer and fewer schools offer technology class on a regular basis. If your school does, you are one of the lucky ones.

That means that a lot of tech instruction falls to you, the content area teacher. The goal is to teach these basic skills so that you can use technology as a learning tool.

So, what are the ESSENTIAL skills that your students should know so that they can use Google Classroom, Drive, Chromebooks, etc in your classroom?

I put together a list of essential skills for elementary, middle school, and high school students, including some resources to help teach these skills. I would love to send it to you!


If you INVEST time early in the school year to teach these basic skills, you can build upon them throughout the school year, using them to do awesome things with technology.

Did I miss something? Was this a helpful resource? Leave a comment and let me know!

Monday, February 27, 2017

Live Streaming via YouTube


Google Hangouts on-air is now YouTube Live Streaming. If you are interested in setting up a publicly visible livestream you will need to visit YouTube, not Google+ as you may have done in the past.

Google Hangouts has a maximum participant limit of 15 (Gmail accounts) or 25 (G Suite for Education / Business accounts). If you need more viewers than either of these limits you will need to use YouTube Live streaming.

I lead monthly webinars to discuss various topics related to educational technology. These monthly hangouts are run through YouTube live. It easy to set up, free, and very easy for viewers to access.

Scheduling a Live stream is quite simple.

1. Visit you YouTube.com/live_dashboard

This will take you directly to the live stream portion of your YouTube account. To schedule a live event, click "events" and click "new live event".


2. Set up your Event

Fill out the basic information on the event page. You can come back and adjust this information later if needed. The date and start / end times are the most important part.

3. Advanced Settings

Most of the default settings on this page should be fine, but there are a few settings you may want to adjust:

  • Live chat - do you want your viewers to be able to chat during the stream? This feature is on by default. 
  • Promotions - by default, Google will post your live stream on your YouTube channel when it goes live. If you don't want the general public to know about this feed, uncheck these boxes. 

That's it! When you are done, click the "create event" button.

Starting your Live Feed: 

To begin your live feed visit YouTube.com/live_dashboard, find your event and click "Start Hangout on Air." This will launch your Google hangout.

Once your hangout has launched you can invite others to join as contributors. You are still in the setup phase. Your feed is NOT being broadcasted.

To officially start your broadcast you must click the green "start broadcast" button at the bottom of your hangout.

Watching a live Broadcast

There are a couple different ways to help your viewers access your live feed.

1. Embed the feed 

Your video feed is a regular YouTube video which means that it can be easily embedded into your blog, website, or even in your learning management system. Viewers just need to click the play button. The video behaves a little like a DVR; viewers will have the ability to watch from the beginning, pause, and rewind the feed as they wish.

The downside to embedding the feed into your website is that viewers won't be able to access the live chat.

2. View on YouTube

Your live stream will also be visible on YouTube. Here, viewers can watch the feed AND participate in the live chat. Simply share the video link with your viewers to give them access to the view page. Note that your video doesn't need to be publically posted on YouTube in order for it to have a "watch now" page. This requires that you send the link directly to your viewers as there is no other way for them to find it.


My Live Stream Page

For my webinars I setup a simple, single page Google Site on which I embed the video stream and provide instructions on how to access the chat. You can view my setup here. 


Post Recording

After your live stream has ended, Google will automatically post a recording of the stream to your YouTube channel. Depending on your settings, this will either be a public or hidden video. The live chat is not saved.

Hangouts On Air is now YouTube live. While the core functions haven't changed, the process of setting up and managing your live stream events is much improved.

Friday, August 29, 2014

Chrome Browser Update: Multi User Sign-In

Chromebooks are quickly becoming device of choice for schools around the country. But what about schools with PC's and Macs in a shared lab or cart setting? The Chrome browser is a logical solution, however in order to take full advantage of the management capabilities of Chrome a student must sign in to Google Chrome, a process that isn't very user friendly. Signing out is even worse.
Chrome Beta improves multi-user browsing

Today the Google Chrome blog quietly announced a new beta feature that will make this process a bit easier. "Share your computer without sharing your business..." The new beta release doesn't provide too much in the way of new features, it simply provides an easier and more streamlined way to sign in to the Chrome browser.

In the beta version of Chrome, a drop down menu in the top right corner of the application indicates the person who is currently signed in. Clicking on the name displays the profile image of the user and a link to switch users (image at left).

While still lacking a few needed features (such as password authentication and a sign-out link) this update moves one step closer to a workable solution for schools that would like to use the Chrome browser to achieve the same management features and functions of ChromeOS.

To download the beta version of Chrome, click here.

Every month I send out an email newsletter highlighting ideas, updates, and new Apps and Extensions for Chromebooks. If this sounds like something you would appreciate, you can sign up here!


Monday, April 15, 2013

Chrome Trick: Favicon Bookmarks

If you are a fan of bookmarking pages in your web browser, you have probably run into the problem of running out of space on your bookmarks bar. The whole point of bookmarking a page is to get to it quickly. Adding folders and additional layers of organization becomes cumbersome and defeats the purpose of bookmarking in the first place!

There is a simple "trick" that you can use to save space on your bookmark bar, allowing you to maximize the available space for your most visited pages.


Chrome Trick: Favicon Bookmarks

If you are a fan of bookmarking pages in your web browser, you have probably run into the problem of running out of space on your bookmarks bar. The whole point of bookmarking a page is to get to it quickly. Adding folders and additional layers of organization becomes cumbersome and defeats the purpose of bookmarking in the first place!

There is a simple "trick" that you can use to save space on your bookmark bar, allowing you to maximize the available space for your most visited pages.


Friday, April 12, 2013

Free Plagarism Checker for the Classroom

The internet has given us unlimited knowledge and information at an instance notice. Generally, this is a good thing, but sometimes students get lazy and use the web in ways that are inappropriate in an academic setting -- plagiarizing work from web sources.

The benefits of the web far outweigh the risk of inappropriate use. As educators we should strive to train our students on acceptable web behavior including the habit of summarizing, quoting, and citing sources. Despite our best efforts, some students choose to bend/break the rules of fair use. 

It is important for educators to be aware of the tools and resources that are available to monitor and deter cheating in the classroom. Turnitin.com is a tool that can be used to check written work for plagiarism. It is a very sophisticated and effective web resources that can quickly scan and find portions of a paper/essay that have been copied from the web or another paper. The downside to turnitin.com is its price, which is prohibitive for many individual teachers and many schools. The service also requires a bit of legwork on the part of teachers and students. 

A free, simple, alternative that I have been using for several years is "The Plagiarism Checker" from dustball.com. Paste in a bunch of text from a suspect paper and The Plagiarism Checker will quickly perform a Google search of multiple portions of the submitted text in an effort to match 

The basic service is free to use. A more advanced and accurate checker is available for $8/month. 

I have personally used this tool on student work. Some students were vindicated while others were busted. 


Friday, March 15, 2013

Chrome Web Extensions: MeasureIt! and Color Picker


Google Chrome is the world's second most popular web browser. Chrome features fast and reliable access to the web. This series of posts highlights Chrome extension and web applications, which enhance and extend what can be done with the Chrome web browser. 

While I don't consider myself a web-designer, I work very hard to make the web resources I create are as visually attractive as possible. Image dimensions and color matching are very important, and very unforgiving. Fortunately, I found two Chrome extensions that have made things much simpler! 

MeasureIt! is a handy little Chrome Extension which allows you to measure the dimensions of anything on your screen. Need to know the width of that internal Google Sites column so that your header image fits? No problem use MeasureIt! to find the exact dimensions. No more guessing, uploading, modifying, uploading, modifying, uploading....

MeasureIt! can be installed here from the Chrome Web Store. 

Color Picker is an extension that offers the ability to see the color value (RGB and Hex #) associated with the color of an object on a web page. This is very handy if you are trying to match background colors and eliminate the floating white box around .jpg files. 

The eye-dropper color selector is a tools that I have long used in PhotoShop. I'm glad that there is a way to do this without the cumbersome task of dropping an image into PhotoShop simply to figure out the color values it contains. 

Color Picker can be installed here from the Chrome Web Store. 

I know there are many other Chrome extensions for taking measurements and finding color values. Let me know if there is something better!


Saturday, December 22, 2012

Chrome Web Extensions: Bitly URL Shortener


Google Chrome is the world's second most popular web browser. Chrome features fast and reliable access to the web. This series of posts highlights Chrome extension and web applications, which enhance and extend what can be done with the Chrome web browser.

There are two things that strike fear into the hear of any teacher that uses technology tools with students: logins and long URLs. 

Logins are still an issue, but the invention of the "short URL" has made getting students to a website much easier! There are lots of URL shortening services: goo.gl, tinyurl.com, and bitly.com

I am a bit.ly user and have found the Bitly Chrome Extension to be very handy when I need to send a direct URL via a tweet, email, or if I am posting a URL on a webpage.


The Bitly extension sits quietly in the top right corner of my screen. When I need a short URL, I simply click the blow fish icon and select the appropriate options. Because I have a Bitly account, my short links are saved automatically.

The Bitly extension does exactly what I need it to do--quickly and simply. If you shorten URL's on a regular basis, check it out. 

Wednesday, November 7, 2012

How to Automagically Create Shared folders for Students: GClassFolders

I've been encouraging teachers to use Google Drive (Docs) with their students for several years now. The collaborative and sharing features of Google Drive are unsurpassed and enable tremendous learning opportunities.

Managing files to/from students and teachers from Google Drive has always been a bit of a challenge. The advent of shared folders was a great leap forward and provided a much quicker way to setup up the infrastructure to move documents between students and teachers.

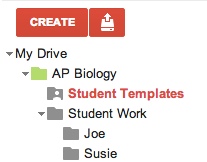
I've led numerous workshops in which I've guided teachers through the laborious process of creating a folder structure for their class. I typically suggest something that looks like this:

This simple structure provides a read-only folder (student templates) into which the teacher can put documents for the students to copy. Students turn their work into the appropriate "student work" folder  allowing the teacher to view and comment on the work.

While this is simple enough for two students (in my example), if you have 100+ students, creating these folders with the appropriate sharing rights can be a daunting task.

I was recently made aware of a brilliant spreadsheet script by Bjorn Behrendt (aka BJ) that automates this process. By simply completing the information requested in the spreadsheet (student name, email address, class, and period) you can create hundreds of folders with sharing permissions in an instant!

Search the Google Docs template gallery for "gclassfolder."


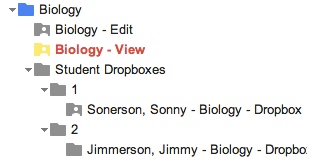
After running the script, folders will be created in your Google Drive account:


A teacher could easily create shared folders for all their students! Head on over to BJ's website for tutorials, FAQ and videos related to using the Gclass script.

Note: I was curious about how the script would handle changes to my class roster. It's very likely that throughout the year a student will add/drop a class and possibly change sections. According to my testing, the script is not intelligent to rename/adjust folder settings based on changes to the spreadsheet. Every time you run the script it create an entirely new set of folders for everyone on the spreadsheet. I would advise that you handle additions/subtractions to your roster manualy instead of by re-running the script. 

Saturday, June 23, 2012

Chrome Web Apps: TweetDeck


Google Chrome is the world's second most popular web browser. Chrome features fast and reliable access to the web. This series of posts highlights Chrome extension and web applications, which enhance and extend what can be done with the Chrome web browser. 

Twitter, your source for Professional Development! 
As an educator, the social media network Twitter has become my #1 source for professional inspiration, encouragement, development, and interaction. Twitter is free, simple to use, and is a great democratizing force. If you are not a Twitter user, I recommend that you check out this post for a full overview of this amazing network!

Very few people access Twitter via twitter.com. Although the web interface has improved, it still leaves much to be desired. Most users take advantage of one of numerous Twitter Clients which enable them to customize their Twitter experience in order to squeeze the maxiumu value out of the network.


The TweetDeck Chrome Web App harnesses the power of HTLM5 for desktop application-like features

TweetDeck is one of the oldest and most popular Twitter clients. I was an avid TweetDeck user for both Mac and PC for several years. Recently, however, I made the switch to TweetDeck Chrome Web-App.

Advantage of Web-Apps over Applications: 
  • No need to install the application on every device you own. 
  • All of your clients sync "in the cloud" ensuring that your settings, themes, ad-ons, etc are consistent no matter where you access the program. 
  • Automatic updates
TweetDeck for Chrome

TweetDeck has long been the leader in Twitter clients which is probably why Twitter, Inc. bought TweetDeck for $40million in 2011. The TweetDeck web App looks and feels very much like the application client. Logging into your TweetDeck account automatically syncs your user settings to the web App, a nice feature that saves on setup time. There are a few features of the TweeDeck web app that I really like: 
  • Easy to connect multiple Twitter accounts. 
  • Easy to tweet from any of your connected accounts. 
  • Ability to schedule tweets
  • List-support
  • Add columns from multiple accounts. 
To install the TweetDeck Chrome Web App, click here or open a new tab in the Chrome browser and click on the "Chrome Web Store" icon. Once in the Web Store, search for "TweetDeck". 


Wednesday, May 2, 2012

Chrome Extension: Docs PDF/PowerPoint Viewer


Google Chrome is the world's second most popular web browser. Chrome features fast and reliable access to the web. This series of posts highlights Chrome extension and web applications, which enhance and extend what can be done with the Chrome web browser. 

Have you ever been frustrated when you are forced to download a PDF, Word, PowerPoint, or other document from the web in order to view it? The process of downloading, finding, and opening the file takes valuable time. The Docs PDF/PowerPoint Viewer by Google solves this problem by allowing Google Docs to open files quickly so that you can preview document contents. If this is the document you need, you can choose to download it in its native format or send it to your Google Docs account for editing (supported formats only).


This extension is installed into Chrome and runs as an invisible background extension. After installing the extension, files will open in the Docs viewer without any action required. If at any time you wish to disable or remove the extension, click on the wrench icon and look through your active extensions.

This extension is a must-have for all Chrome users but will be of special importance to anyone who has decided to no longer invest in the Microsoft Office suite. These individuals can still view MS Office files without needing to maintain a copy of this expensive program. This extension also has valuable classroom significance as it simplifies the process of viewing files. Younger students who may struggle to download, find, and open a file will be greatly assisted by the installation of this extension.

Chrome Extension: Docs PDF/PowerPoint Viewer


Monday, April 30, 2012

New Series: Chrome Web Apps and Extensions


Google Apps for Education has become a platform for accessing web-based tools as much as it is a tool itself. While Google Docs, Sites, Calendar, etc remain the core tools, more and more third party services are being made available.


In addition to the growing popularity of Google Apps for Education, the Chrome web browser and operating system continue to gain popularity as a gateway to the web. For schools using Google Apps for Education it makes sense that they would also adopt the Chrome web browser which is the most reliable and stable way to access technically complex products such as Google Docs and HTLM5 websites. General users are also realizing some of the benefits of Chrome and have begun to switch, making Chrome the second most popular way to access the web.


Because of the popularity of Google Apps for Education, Chrome OS, and the Chrome web browser, I've decided to launch a new series of posts on Chrome web Apps extensions. Each week I will select and review a different app and extension and discuss its application for personal productivity as well as its classroom potential.


Chrome Web Extensions are "add-ons" which increase the function or abilities of the Chrome browser. Some extension provide background services while others are accessed for specific tasks. Users who sign-in to the Chrome browser can sync their extensions across multiple devices.

Chrome Web Apps are more robust and full-featured web programs that allow users to accomplish more complex tasks. Many web apps are built using HTLM5 which enables very complex multimedia usage. Generally, web apps run full-screen and function like traditional desktop programs.

I hope you will check back to learn more about my favorite Chrome Apps and Extensions. What's your favorite? Please let me know by leaving a comment.

Friday, December 30, 2011

Back Up Your Google Docs!

I know that cloud-based applications were supposed to eliminate the need to back up your files. Call me paranoid, but I have begun to back up my Google Docs account.

In the event that someone hacks into my account, causing it to be locked by Google, I could lose access to some very important documents and information. To mitigate this risk, I have begun saving a copy of my documents on a semi-regular basis. Here's how to do it.

Friday, March 18, 2011

How to Make Free Calls Through Gmail

Did you know that you can call US based phones within  Gmail for free? It's a really neat feature that I have been taking full advantage of! If you have Google Voice, you can also receive calls placed to your Google Voice number within Gmail.

Google will be offering free phone calls within Gmail until the end of 2011. You can also place calls to international numbers for very reasonable rates. This feature is only available for US based Gmail accounts.

Saturday, March 5, 2011

Save time with the Gmail "Canned Response" Lab

If you find yourself writing the same thing to reply to multiple email messages then you should take advantage of the "canned response" lab from Gmail. Use it to format a pre-written response and then quickly insert it into an email message. For complete instructions, view the video below.

Monday, December 27, 2010

10 Google Voice Tricks That Will Rock Your Phone!


Phones are remnants of the analog world. Google Voice adds your phone into the cloud! If you aren't currently using  Google Voice, I would recommend my my previous post for a basic overview of the service. If are a user, here are 10 tips to rock your phone! If you have other creative ways that you have used Google Voice, please leave a comment!
  1. Call from Gmail. Connect your Google Chat account to Google Voice. You will be able to send and receive calls and SMS messages from within Gmail. To do so, login to Google Voice, click "settings" and check the box labeled as "Google Chat"
  2. Block Annoying People. Someone calling that you would prefer not to talk to? Log in to your account, find their latest call, select the "more" pull down and click "block caller". From this point forward, whenever this number calls, they will receive a "number disconnected" message. Brilliant!
  3. Reach Out with Voice! Create a custom calling widget such as the one below. Don't be shy, click and try it out! When you type in your phone number Google will call your phone and connect you to me. Your call will be automatically sent to my voice mail. Note that I have recorded a special message that only those who use this widget to call me will hear. 
  4.  
    **Update: It appears that there are some browser compatibility issues with the call widget. I have been unable to view the widget when viewing my blog through Firefox. Chrome, Safari, and Explorer seem to work without issue.***
    4. Screen your calls. Remember old-school answering machines? My family used to listen to the message before we picked up the call. You can do the same thing! When a call comes in when I am within Gmail I can click "screen" to listen to the message being left for me. If I want, I can pick up the call.
    5. Custom Greeting. Google Voice integrates with your Gmail address book. Groups that you create in Gmail are populated into your Google Voice address book. You can then easily create filters to, say always send calls from the office to voice mail after 5pm or set calls from your immediate family to ring all of your phones simultaneously. 
    6. Free Calls! If you have a calling plan that includes "family circle" or "my fav's" in which you can specify frequently dialed numbers which are free to call, you can get unlimited calling for free. Simply set your Google Voice number as one of your free numbers and dial from within your Gmail account, Google voice account, or by using the Google Voice iphone app. Your service provider will only see your Google voice number, not the number of the person who you are trying to call, giving you unlimited free minutes.
    7. Personal Transcriptionist. On the road? Need to compose an email? Use Google Voice as your personal transcriptionist.  Call yourself and start talking. Your voice mail message will be transcribed an emailed to you. Copy and paste the text, correct the errors in the transcription, and you're done!
    8. Podcaster! Use Google Voice to create audio podcasts. Simply call yourself and leave a voice mail message. Later, log in to your account, find the message, click "more" and then "download message." An mp3 file will be created that you can then add to iTunes or any other podcasting service. Keep in mind that the recording will be dependent upon the clarity of the call connection and the quality of your cell phone. I would recommend using a headset when recording calls. 
    9. Don't Forget! Add notes to a voice mail indicating follow up tasks, reminders, etc. This would be a great feature for anyone in sales who makes a lot of phone calls. Keep track of when you called, who you talked to and what you promised.
    10. Never miss a call! A lot of your friends/family already have your mobile or work numbers. If you don't pick up when they call one of your personal lines, you can tell Google Voice to forward the call to all of your other phones. For example, your mom calls your cell phone which you left at home. When you don't answer it first rings your office phone before sending mom to your voice mail. To enable this feature login to your Google Voice account and go to setting --> phones --> select "edit" on the number you wish to enable this feature for --> "show advanced settings" --> "forwarding options" (at the very bottom).